
The workbench
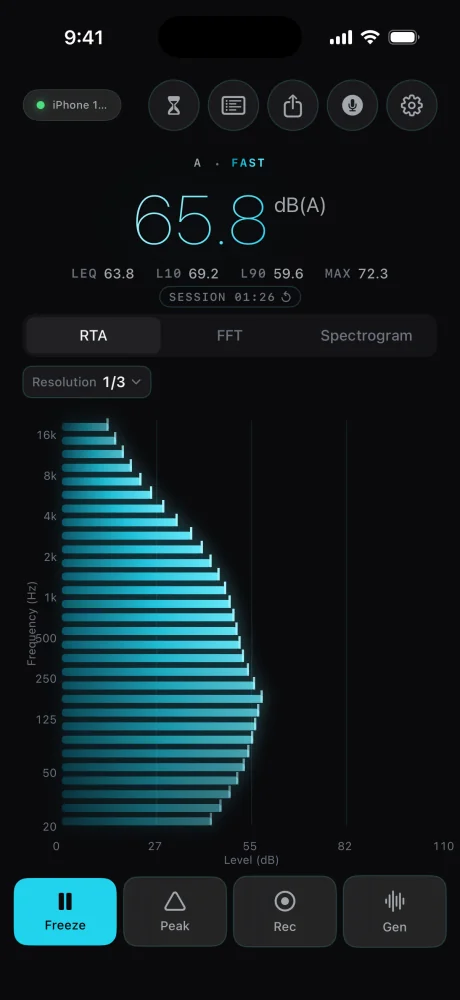
One screen: the level on top, a chart under it, and a few tools around the edge.
SoundMess Lab opens straight onto its workbench. There is no sign-up and no tour, just two small pointers the first time on iPhone: one on the view switcher, one on Freeze. The first thing it asks for is the microphone, because without it there is nothing to measure.
Allow the microphone. SoundMess Lab measures through it live and records nothing until you press
Rec.Read the level. The big number is the sound level right now, with its weighting above it (
A · FASTto begin with). See Sound level.Pick a view.
RTA,FFTorSpectrogram. Tap one, or on iPhone swipe left and right on the chart. On the 3D waterfall a drag turns the picture instead, so tap the tab there.Hold what you see.
Freezestops the readout and the chart; tapResumeto go live again.Peakkeeps the highest level of each band on screen.Check the trust. The info button in the top row says how far the microphone can be trusted at each frequency. See How far to trust it.
Device pill
Your model, and Baseline or Calibrated. On iPhone it's often cut short; Settings shows it in full.
Tools
RT60, Recordings, Export, Measurement info, Settings.
Level
Live level with its weighting: A · FAST, dB(A).
Session
LEQ, L10, L90 and MAX. Tap SESSION to start over.
Views
RTA, FFT and Spectrogram. On iPhone, swipe the chart to switch.
Bands
1/3-octave bands, 20 Hz at the bottom.
Toolbar
Freeze, Peak, Rec and Gen.
On the left, the device pill names your iPhone or iPad and says Baseline or Calibrated (on iPhone it's often cut short; Settings → Device shows both in full). On the right, five round buttons:
| Button | What it opens |
|---|---|
| Hourglass | Room RT60 (Pro) |
| List | Recordings (Pro) |
| Share | Export (Pro) |
| Info / microphone | Measurement info: the trust ranges and the active input |
| Gear | Settings |
A small orange lock means that button belongs to Pro; tapping it shows what Pro adds. The info button turns into a microphone once audio input is running.
Freeze, Peak, Rec and Gen sit along the bottom. Rec starts a recording of whatever view is on screen, and Gen opens the signal generator. Both are Pro, and both light up while they run.
Turn your iPhone sideways and the workbench lays out in landscape: the device pill, the top-row buttons and the level in a column on the left, the views and the chart in the middle, and Freeze, Peak, Rec and Gen in a rail on the right.
If SoundMess Lab can't hear, it says so over the workbench instead of showing a frozen number:
Microphone access is off: tapOpen Settings, allow the microphone, come back and tapTry again.Measurement paused: a call or another app took the microphone. It resumes on its own when the input is free; if it asks, tapResume measurement.Audio input unavailable: tapRetry audio input.
On iPad the workbench is the same, just larger: one chart at a time, with the same top row and toolbar. Switch views with the tabs.
Related
- Sound levelThe big number, its weighting, and what LEQ, L10, L90 and MAX say about the session so far.
- Real-time analyserThe sound split into fractional-octave bands from 20 Hz to 20 kHz, drawn as bars you read from the bottom up.
- How far to trust itPhone microphones are good in the middle and unreliable at the ends. SoundMess Lab shows you which is which.
Still stuck? Write to zhi@nonoaudio.com. Support page